Protect Your Apps Using Idaptive and Netskope CASB Provider

This blog provides step-by-step instructions on how to set up the Netskope SAML Proxy, configure SAML app in Idaptive and the necessary configuration in a representative SaaS app provider, Salesforce.

Idaptive partners with Cloud Access Security Brokers (CASB) to provide the first critical steps in enabling secure SaaS applications. By driving the authentication process through Idaptive, CASBs utilize the necessary information about users, their devices, and their location to manage access to and monitor user activity within apps.
Netskope is a CASB solution that is placed between consumers and cloud service providers to address cloud service risks, enforce security policies, and comply with regulations. SaaS applications like Salesforce can be configured to be protected by Netskope Reverse Proxy so that all end user traffic to the app is routed via this proxy enabling Netskope to detect anomalies. However, when an Identity provider like Idaptive is used for SSO authentication of a SAML based app like Salesforce, post authentication the user is redirected directly back to the app thereby bypassing the Netskope proxy and its ability to detect anomalies.
This blog provides step-by-step instructions on how to set up the Netskope SAML Proxy, configure SAML app in Idaptive and the necessary configuration in a representative SaaS app provider, Salesforce. This will enable Netskope to have complete visibility into the application transactions, perform deep transaction analytics and enforce compliance in conjunction with Idaptive context data.
Configure SAML app in Idaptive
- Login into Idaptive Admin Portal and follow the steps listed here to configure Idaptive SAML SSO with Salesforce.
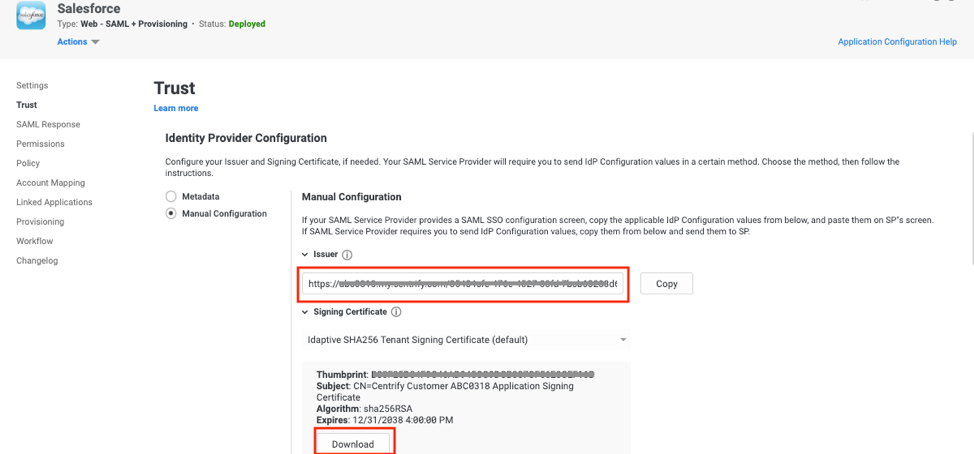
- Navigate to the Salesforce app setup in Idaptive (previous section) and copy the value of the Issuer under Trust > Identity Provider Configuration > Manual Configuration section for use in the next section.
- Download the Signing Certificate from Trust > Identity Provider Configuration > Manual Configuration section for use in the next section.
Configure SAML Proxy in Netskope
- Login to Netskope console as an administrator
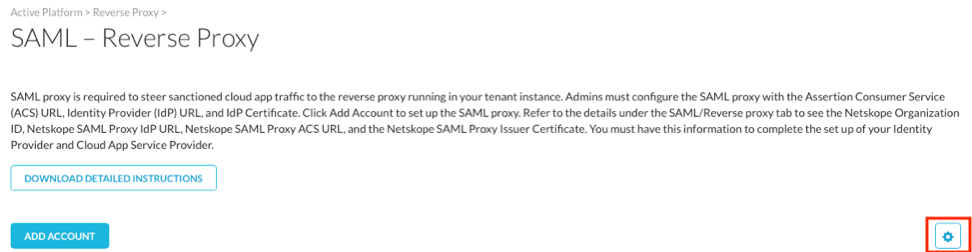
- Navigate to Settings > Active Platform > Reverse Proxy > SAML
- Click on gear icon to open up SAML Proxy configuration
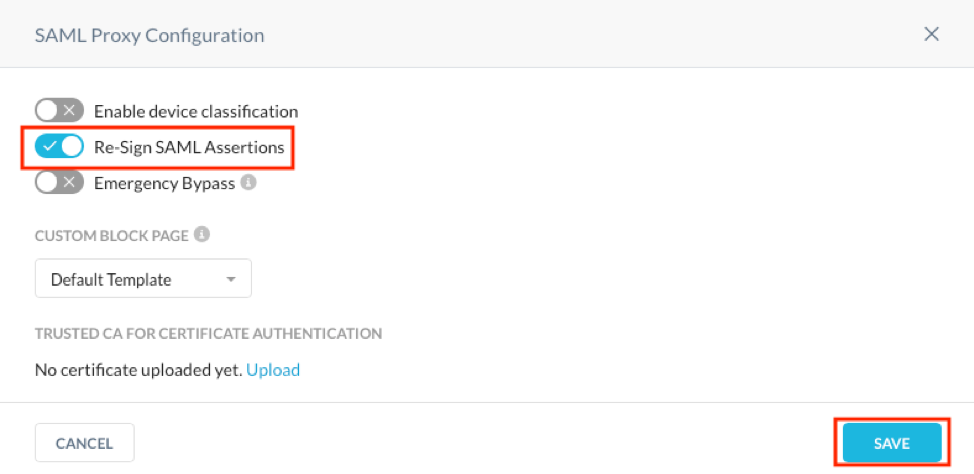
- Ensure that Re-Sign SAML Assertions is checked on and click Save
- In the SAML Reverse proxy screen, click Add Account button
- Select Salesforce from the App dropdown
- Provide the Name as Salesforce.com – Idaptive
- For the ACS URL, provide a temporary URL like https://temp.com. We will need to change this once we configure the SSO settings in the SaaS app, Salesforce.
- For the IDP URL, provide the value of the Identity provider Issuer captured in the previous section (Step 2 of Configure SAML app in Idaptive section).
- For the IDP Certificate, open the Identity provider Signing certificate downloaded in the previous section (Step 3 of Configure SAML app in Idaptive section) in a text editor and copy the entire contents to this field.
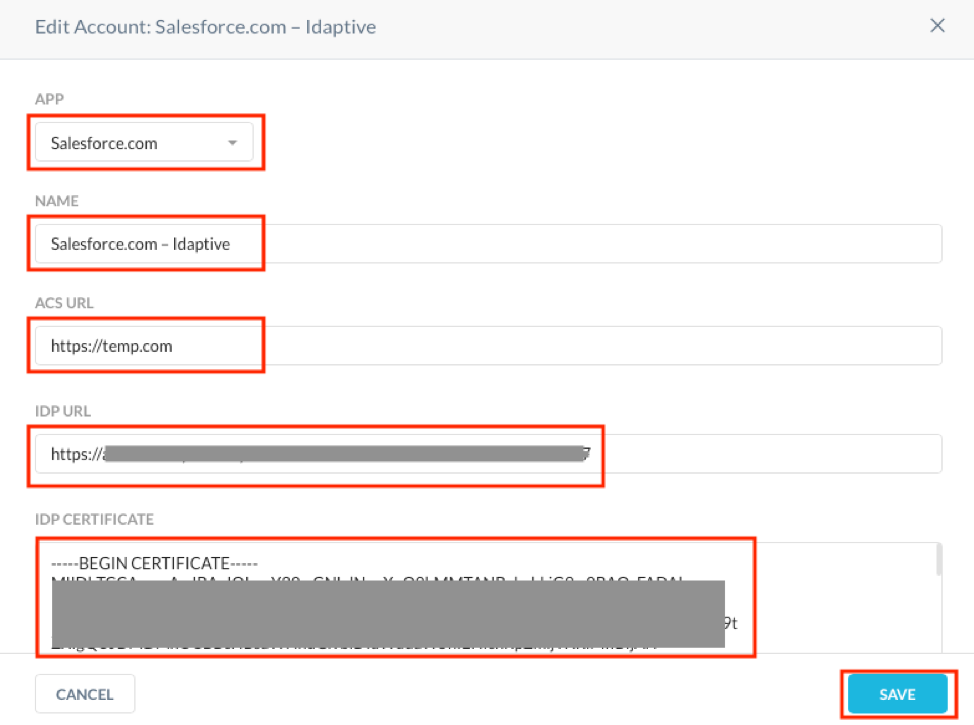
- Click Save.
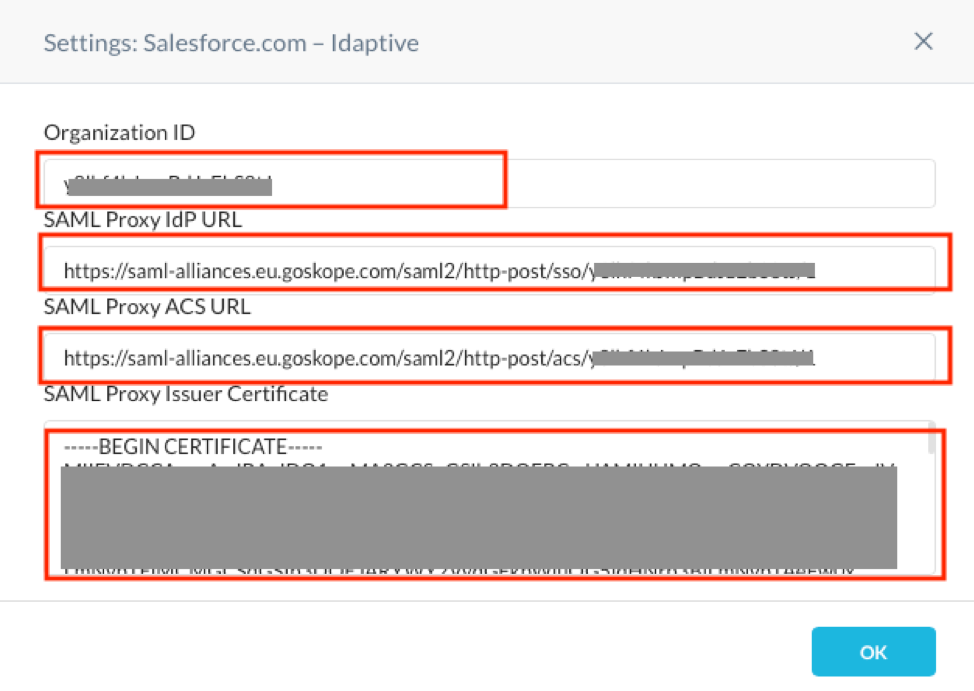
- Click on the magnifying glass icon Next to Salesforce – Idaptive account.

- Copy the values of Organization ID, SAML Proxy IdP URL and SAML Proxy ACS URL for use in the next section.
- Copy the contents of SAML Proxy Issuer Certificate into a text editor and save it as netskope.cert for use in the next section.
Configure SaaS App Service Provider
- Login to Salesforce console as administrator.
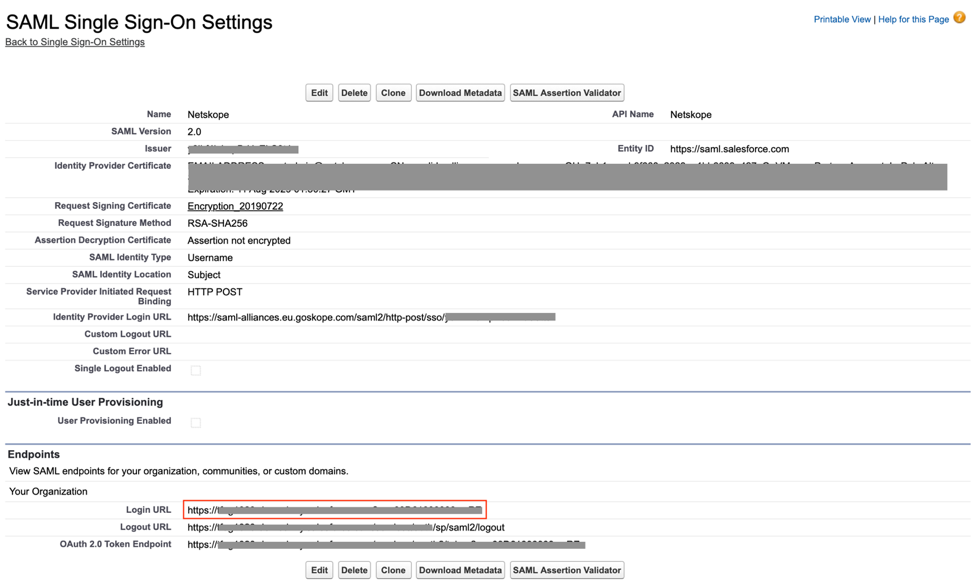
- Navigate to Administer > Security Controls > Single Sign-On Settings.
- Click New, enter the following and save.
- Name: Enter the name for this setting like Netskope.
- Issuer: Enter the Organization ID value you saved in the previous section (Step 13 of Configure SAML Proxy in Netskope section).
- Identity Provider Certificate: Click Choose File to locate then upload the netskope.cert file you saved in the previous section (Step 14 of Configure SAML Proxy in Netskope section).
- Request Signature Method: Ensure it is RSA-SHA256.
- Identity Provider Login URL: Enter the SAML Proxy IdP URL value you saved in the previous section (Step 13 of Configure SAML Proxy in Netskope section).
- Entity ID: Enter https://saml.salesforce.com

- Once saved, copy the Salesforce Login URL value from the Endpoints section
A few more configuration steps in Netskope and Idaptive admin portals
- Login back to Netskope Admin portal, open the Salesforce – Idaptive app and replace the ACS URL from https://temp.com to the value of the Salesforce Login URL obtained from the previous section (Step 4 of Configure SaaS App Service Provider section).
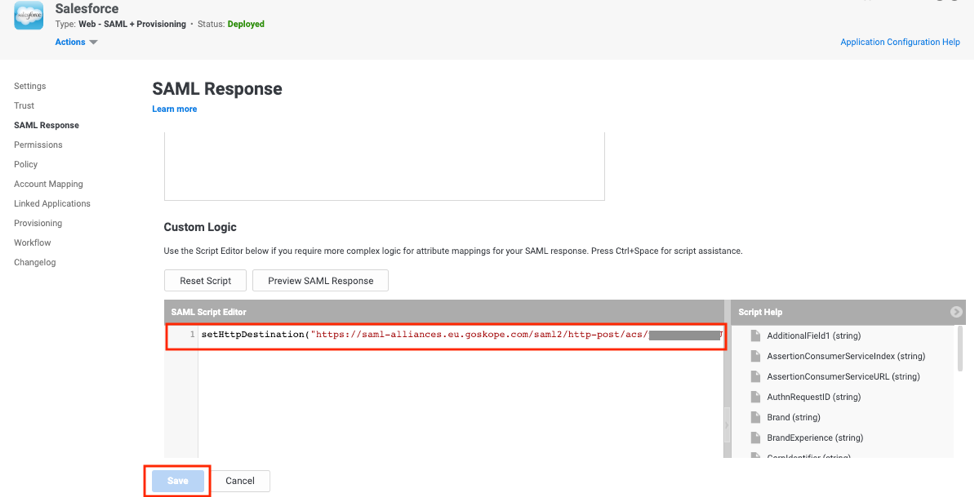
- Login back to Idaptive Admin portal, open the Salesforce app and navigate to SAML Response.
- In the Custom Logic section, add the following script and click Save.
setHttpDestination("<SAML Proxy IdP URL>");
where <SAML Proxy IdP URL> is the value captured in Step 14 of Configure SAML Proxy in Netskope section. This step allows Idaptive to pass the SAML assertion for Salesforce to the Netskope proxy, instead of directly to the service provider. Netskope then passes the SAML assertion on to the service provider, Salesforce.
Finally, let’s test if everything is working as expected…
- Login to Idaptive end user portal and launch the Salesforce app.
- System should SSO to Salesforce app. Notice a rewrite of the Salesforce URL, something like https://xxx---my.salesforce.com.rproxy.goskope.com, indicating that the user is now proxied through the Netskope SAML proxy.
- Sign out of the Salesforce app and login using the direct application url, http://xxx.my.salesforce.com.
- System should redirect authentication to Idaptive and post authentication, should sign on to Salesforce as the user. Notice a rewrite of the Salesforce URL, something like https://xxx---my.salesforce.com.rproxy.goskope.com, indicating that the user is now proxied through the Netskope SAML proxy.
- Once Netskope is configured to Introspect Salesforce app, this integration can realize the benefits of the Netskope CASB as defined here.
Try out this integration with Netskope using Idaptive’s free 30-day trial here.
Rajesh Pakkath

Rajesh Pakkath is Director of Product Management at Idaptive, responsible for driving the product strategy and roadmap for Idaptive's Next Gen Access Cloud platform that secures access for everyone, everywhere and on every device.
Prior to this, Rajesh was a Senior Principal Product Manager at Oracle Corporation, where he led the development and delivery of the company’s on-prem, cloud identity and mobility products.
With more than 20 years of experience in designing, developing and delivering software, Rajesh has leveraged his deep technical, domain and consulting background to develop innovative products and solutions in the Identity and Access Management space.
Rajesh graduated from Coimbatore Institute of Technology, India with a degree in Applied Sciences and is an Associate Member of Institution of Engineers, India.